Friday, July 29, 2016

Internet Explorer End of Life Nag

I was at a customer that recently complained that many of their Internet Explorer applications hosted on Citrix XenApp were opening additional tabs for users asking for Internet Explorer to be upgraded. This as it turns out is by design from Microsoft. As of January 2016 IE 8-9-10 are no longer receiving updates from the software giant. They want everyone to move to Internet Explorer 11. This nag screen is actually part of the last update to each to of the legacy browsers - so it is 100% by design.

Of course many enterprise applications were written to work with older versions of IE and development or testing cycles may not be available to simply upgrade. So how to get around this nag window? Fortunately Microsoft has enabled a new feature control registry value that can override this default option. Full details can be found here. I have included the snippet regarding x64 configuration below. Throw this in a group policy preference and apply where needed - no more nag screens!

For x64-based systems

  1. Click Start, type regedit in the Start Search box, and then click OK.
  2. Locate the following registry subkey:
    HKEY_LOCAL_MACHINE\SOFTWARE\Microsoft\Internet Explorer\Main\FeatureControl
  3. Right-click FeatureControl, point to New, and then click Key.
  4. Enter FEATURE_DISABLE_IE11_SECURITY_EOL_NOTIFICATION, and then press Enter to name the new key.
  5. Right-click FEATURE_DISABLE_IE11_SECURITY_EOL_NOTIFICATION, point to New, and then click DWORD (32-bit) Value.
  6. Enter iexplore.exe, and then press Enter to name the new value.
  7. Right-click iexplore.exe, and then click Modify.
  8. In the Value data box, enter 00000001, and then click OK.
  9. Locate the following subkey:
    HKEY_LOCAL_MACHINE\SOFTWARE\Wow6432Node\Microsoft\Internet Explorer\Main\FeatureControl
  10. Right-click FeatureControl, point to New, and then click Key.
  11. Enter FEATURE_DISABLE_IE11_SECURITY_EOL_NOTIFICATION, and then press Enter to name the new key.
  12. Right-click FEATURE_DISABLE_IE11_SECURITY_EOL_NOTIFICATION, point to New, and then click DWORD (32-bit) Value.
  13. Enter iexplore.exe, and then press Enter to name the new value.
  14. Right-click iexplore.exe, and then click Modify.
  15. In the Value data box, enter 00000001, and then click OK.
  16. Exit Registry Editor, and then restart the browser to enable the new key.

Wednesday, July 27, 2016

XenDesktop 7.x Database Maintenance & Considerations

I recently spent time with a client having SQL issues related to XenDesktop. As it turns out they were exhausting transaction log space. I figured I would throw together a post about some of the considerations and best practices I have seen around this topic.

Considerations N'at

  1. Monitoring: 
    • First and foremost, whatever you design, something-will-fail-eventually. I cannot stress monitoring enough. From simple OS-level monitors such as disk space and event log scraping to more-in-depth (and expensive) end-to-end monitoring solutions. My personal favorites over the years have been ControlUp and Solarwinds. You can write your own via PowerShell with a little research if you can't spring for a third-party product. I just can't harp on this item enough.
  2. One-or-many? 
    • It is recommended to separate the 3 primary DB data sources into separate actual databases. A Site, Logging, and Monitoring DB. In the latest versions this is the option up front. Original releases this had to be done after the site was deployed. 
  3. The Databases:
    1. Site: 
      • Size corresponds to user activity (since session information is tracked). Peak usage = peak size.
      • Two-days worth of connection data is kept in the site DB, thus the largest size will be achieved two days after peak user connectivity.
      • Activity is greatest during high login periods as information is frequently requested.
      • An outage to this DB can cause the inability to launch sessions (session leasing not withstanding)
    2. Logging: 
      • Historical logging of site changes
      • Sizing is not predictable as it depends on the number of changes in the site (including administrative actions in Director)
      • Low I/O needs
      • There is no retention policy so old data must be purged manually.
      • If site policy does not allow changes to be made without the logging DB present, no site reconfiguration will be allowed. 
    3. Monitoring:
      • Used by Director to display data. 
      • Max size is determined by retention period (7 days for non-platinum; platinum defaults to 90 and is configurable). Peak size will be when this period is reached.
      • Data is collected in a manner that limits transactions, thus lowering I/O needs
      • Data flushing occurs overnight. 
      • An outage prevents collection of historical data
  4. The TempDB:
    • The SQL Temporary DB impacts the performance of SQL and the performance of XenDesktop. Usually I will configure SQL with specific drives for Data, Logs, Backups (depending on solution), and the TempDB. This allows for flexibility in regards to sizing and performance. The purpose of the TempDB is to eliminate locks on the Site DB (and others) which in a large scale environment could lead to slow performance. This DB is usually small, and a sizing guide is in the references section. 
  5. Use Read-Committed Snapshot Isolation:
    • Say what? In short, this isolation improves performance, particularly during intense login periods. If you have a larger environment, users of Studio and Director will thank you.
  6. Sizing:
    • As much as I would love to write a novel about DB sizing - the below table from the Citrix document linked under references sums up a ballpark for your site-DB sizing needs. The other DBs are tougher to predict and should be monitored and are more variable. The Monitoring DB will likely grow the largest of all three. There are some estimates in the sizing guide on pages 6 & 7 if review is desired.
  7. CPU Usage:
    • Summary of Citrix's intensive testing of SQL performances recommends a single quad-core SQL server for XenDesktop deployments. 
  8. DB Maintenance:
    • Usage of DB Mirroring or Always-On features results in full transaction logging mode. This results in the transaction logs of all three DBs to continue to grow until a log backup is taken. This will cause issues without monitoring (disk space utilization, performance).
    • It is recommended to back up transaction logs regularly if utilizing one of the mentioned high availability methods. This could be done with scheduled backups or with SQL Server Agent. 
    • Citrix recommends Index rebuilds occur over night or on weekends. Page 13 of the Sizing Guide provides more details on scripts for this. (They actually recommend using the Windows Server Update Services script modified for XenDesktop.)


References (just so you know I didn't make all of this up).

Monday, July 25, 2016

vCenter Appliance: LDAP Integration

Who wants to give out their root password whenever they need to have IT staff manage their VMware environment? No one. Fortunately this one is fairly straightforward. Our goal in the end will be to land on the vSphere vCenter Web Portal and be able to check the box to pass through our Windows credentials. For this sample I am going to utilize a group call VMware-FullAdmins as my security group and the domain administrator account for validation. Avoid using the AD administrator account in any production environment. Set up a delegated VMware administrators group and assign those users needing permissions.

  1. Log into the vSphere console at <IP>:9443 with the administrator@vsphere.local account. You will need to use the web console. The fat client has had this option removed in latest versions. 
  2. Find the Administration node. You should have Single Sign-On > Configuration available to select.
  3. You will have Policies / Identity Sources / Certificates tabs. Select Identity Sources.
  4. Click the Plus to add a source.
  5. Entered the information for your domain. Keep in mind that the Alias field cannot have punctuation - is should be the shortname for your domain. Sample information below.
    Name: MyDomain.Local
    Server URL: ldap://lserver.mydomain.local:389
    Type: ActiveDirectory
    Domain: MyDomain.Local
    Alias: MyDomain
  6. Now that your source is available for authentication we will want to add our VMWare-FullAdmins group for access.
  7. Select vCenter Servers in the left menu column
  8. On your vCenter server right-click and select All vCenter Actions>Add Permission.
  9. You can now select to search MyDomain.Local for VMware-FullAdmins and add it at this level to have full administration capabilities for the environment.
  10. Now just populate VMware-FullAdmins with those you need to manage your environment and you can stop handing out your built-in privileged accounts!


Monday, July 18, 2016

Adding ESXi Hosts to your vCenter Appliance

Once you have your vSphere vCenter 5.5 appliance up and running, configured with any desired Datacenters and Clusters, it is time to add ESXi hosts.


  1. Log into your vCenter web portal <IP>:9443 with an administrator account.
  2. Locate the datacenter or cluster you wish to add your host into. Right click on it and select add host.
  3. Now you will need to fill in the name and location of the host, plus the local account for access.
  4. Verify that the host was connected to and if any VMs exist they are all listed. 
  5. Assign your license
  6. Use lockdown if desired. Lockdown prevents direct access to the host. 
  7. Review all of the settings and click Finish to initiate.
The process should take a few minutes to complete. You can keep track in the Recent Tasks section of the progress. You will also see any new VMs, networks, etc. appear in your infrastructure as they are added. VMs running on the host should not see any disruption during this process. You are just taking management of the host over, it should keep running with any assigned resources.

Sunday, July 17, 2016

New Garden Fence

Last week Isbir Landscaping & Allegheny Fence teamed up to put a new 6' fence around my 38'x54' garden. Complete with 4"x2" wire mesh buried 5" deep and rabbit wire at the bottom to hopefully keep out some of the neighborhood wildlife. They did a great job. I had them leave the posts a little high for some decorative postcap installation. Too bad it is still early in the season or I could have shared some veggies with them while here.

Original Garden. Deer & rabbit repellent only works so well. (Lost the beans.)

End of day 2. Posts are all in. 

Completed product sans decorative topping.

Saturday, July 16, 2016

Configuring the vCenter Appliance

Previously I provided an overview of the straightforward importation of the VMware vCenter Appliance. Today I will walk through the configuration of our newly deployed vCenter Appliance.


  1. Once you have completed your deployment of the appliance and powered it on, you can open the console view in the vSphere Client to get a quick glimpse at what is in store for configuration. You need to have DHCP enabled on the assigned network mapping to get the IP in step 1 to present.
    • Note: If you are doing a greenfield deployment with 5.5 as I am, there is a feature to be aware. You will need to kill Tomcat before continuing or the Wizard will fail. Use the console or SSH to your new instance and type service vmware-vpxd stop at the prompt and hit enter. This will stop the vpxd service - not doing this will cause errors. I haven't found this formally documented anywhere unfortunately rather through trial and error.
  2. Navigating to the DHCP assigned IP - https://10.0.0.164:5480/ - you will get hit with the much expected certificate warning. Depending on your browser, methods for bypassing this vary. (Hopefully since you are deploying vCenter you know how to add a security exception for your browser!). 
  3. Assuming use of a Static IP - close out of the Wizard.
  4. Click on the Network tab
  5. Select the Address Button
  6. Change the IPv4 Address Type to Static - you now can change the hostname. Fill in the desired hostname, IP, gateway, DNS Server, mask, and save the settings.
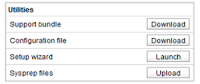
  7. The network changes made will require reloading the URL for management to your new static IP. Log back in and under utilities Launch the Setup Wizard.
  8. Follow along on the setup wizard:
    1. Log in with the default username/password combination of root/vmware and accept the EULA.
    2. Enable or leave disabled (my choice) data collection
    3. Select the custom configuration radio button. You will get to define each step except NTP here. NTP will use the specified Active Directory PDC Emulator provided time. 
    4. Check the Active Directory Enabled box & Fill in the appropriate values for your domain
    5. For SSO select Embedded as well, just like the DB. Enter a password for the administrator account.
    6. With authentication configured for Active Directory the the time options automatically get configured to utilize AD synchronization. 
    7. Once reviewed and configuration initiated all of the above options shoudl succeed.
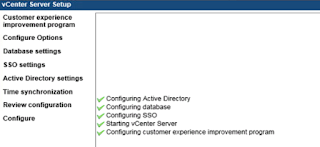
    8. Click close and you should be up and running:
A couple of considerations:

Database Settings
Why did I choose to use the embedded DB? In this setup I don't have a separate SQL server for the database. Given I just have a small two node lab, this isn't an issue. Keep in mind, VMware only supports external Oracle databases. Fortunately the embedded PostgreSQL database will support up to 1,000 hosts and 10,000 virtual machines. If you are surpassing those numbers, you probably have access to Oracle. I am not so fortunate.


Sizing
By default the Services configurations are for small environments. I will leave my Services configurations at the default settings. This is one screen where the settings will impact multiple settings including modifications to the VM which runs the appliance. Reference KB2057376 to review large scale deployment tuning.


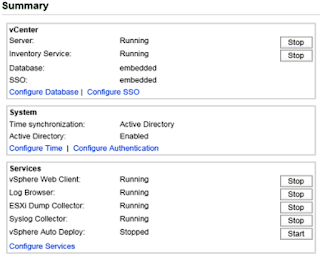
At this point you have a vCenter Server Appliance that is online with a static IP and communicating with Active Directory. Now go over to the Admin tab and change the root password. You can open up an Adobe Flash enabled web browser and navigate to <IP>:9443 to access to portal of your new vSphere Web Client. Right now only root can log in - something we will want to take care of down the road. 

So now you have the vCenter appliance up and running! Great! Oh, yeah, we don't have any hosts or VMs to manage yet! I'll have to get to this next time. 

Thursday, July 14, 2016

Deploying the vCenter Appliance

Much like other vendors, VMware has jumped on the appliance bandwagon. Starting with VMware 5.x and continuing on to 6.x, the vSphere vCenter tool has been available as an importable appliance and not just the traditional Windows install. Simple to get up and running, a high-level of the steps needed for deployment can be found below.


  1. Download the Appliance from VMware.com for your appropriate version. In this example I will be using 5.5. You can download either the full OVA file or the individual OVF and hard disk files. For all-in-one ease, here we are going with the OVA.
  2. Next open up your local vSphere Client. Assuming you don't have vCenter in place already, you will need to point to a host for authentication and then select File>Deploy OVF Template.
  3. Browse to your download and select next.
  4. Review your details to make sure you selected the appropriate template.
  5. Name your appliance appropriately.
  6. Select an appropriate storage datastore.
  7. Choose an appropriate disk format (if no one is monitoring storage growth - stick with Thick)
  8. Select an appropriate Networking Mapping
  9. Finish your deployment and sit back while the appliance imports. (A few minutes typically.)
It was that simple! Once the import is complete you can power it on and use the default combination of root/vmware to log in. 


Wednesday, July 13, 2016

G'N'R @ Heinz Field July 12, 2106

Great Guns N' Roses show @ Heinz Field last night in Pittsburgh! 2+ hours of rocking music. Sharing some pictures of my time out with friends.

Drinks and dinning @ Sharp Edge on Penn Ave ahead of festivities. 
Phil, Emily, myself, and the wife enjoying $13 beers on the floor prior to the show.
Maybe 45 minutes before showtime. Getting to our seats.
Almost showtime
Show underway!
Set-list from the evening is below. 

  1. It's So Easy
  2. Mr. Brownstone
  3. Chinese Democracy
  4. Welcome to the Jungle
  5. Double Talkin' Jive
  6. Estranged
  7. Live and Let Die (Wings)
  8. Rocket Queen
  9. You Could Be Mine
  10. Raw Power (Iggy and The Stooges)
  11. This I Love
  12. Civil War
  13. Coma
  14. Speak Softly Love (Love Theme from The Godfather)
  15. Slash guitar solo
  16. Sweet Child O' Mine
  17. Better
  18. My Michelle
  19. Slash & Fortus Duet ("Wish You Were Here" by Pink Floyd)
  20. November Rain
  21. Knockin' on Heaven's Door (Bob Dylan)
  22. Nightrain
  23. Patience - encore
  24. The Seeker (The Who) - encore
  25. Paradise City - encore


Thursday, July 7, 2016

The Short Stick

Sometimes you read an article and are left wondering about the future of a product or products. Priyanka Somashekar has a very nice write up about Citrix Director-based CPU & Memory utilization reporting. This feature, new with XenDesktop/XenApp 7.9 makes one think back to yesteryear with the data that Edgesight could obtain but that has always been missing from the 7.x lineup of Citrix workspace delivery tools. My response: Hallelujah!

Then I got to the end of the article and the comments. While 7.9 was explicitly mentioned as when the feature was released, towards the end Citrix Cloud was mentioned - but no on-premise. My fears were confirmed in the comments:
This feature is currently supported on Citrix Cloud. 
Seriously!?!? Such a significant release and it is only available on the Cloud product. While I know the Cloud product is a strong push for Citrix right now, neglecting 99% of the customer base with such a major announcement I can classify as rude and misleading - especially when this tidbit had to be spelled out in the comments and wasn't explicitly disclosed in the article.

Citrix Cloud is great for those environments that can use it (especially for DevOps). Given the need to have applications and data close to one another for performance purposes, large scale enterprise-class adoptions just won't be there until that hurdle can be overcome. Shame on you Citrix for the underhanded marketing ploy to make such a major feature that enterprises clients *need* and only deploy it in such a limited scope.


Tuesday, July 5, 2016

4th of July Food

I always love a good cookout on holiday weekend. This weekend featured a giant homemade cheeseburger layered with fresh onion, yellow sweet pepper, pepper bacon, pickles, and homemade coffee-infused BBQ sauce on a kaiser roll. Still not exactly sure how I fit it in my mouth.

(Classy Thin Print shades are optional for a good time. Suspenders required.)