- Log into the vSphere console at <IP>:9443 with the administrator@vsphere.local account. You will need to use the web console. The fat client has had this option removed in latest versions.
- Find the Administration node. You should have Single Sign-On > Configuration available to select.
- You will have Policies / Identity Sources / Certificates tabs. Select Identity Sources.

- Click the Plus to add a source.
- Entered the information for your domain. Keep in mind that the Alias field cannot have punctuation - is should be the shortname for your domain. Sample information below.
Name: MyDomain.Local
Server URL: ldap://lserver.mydomain.local:389
Type: ActiveDirectory
Domain: MyDomain.Local
Alias: MyDomain - Now that your source is available for authentication we will want to add our VMWare-FullAdmins group for access.
- Select vCenter Servers in the left menu column
- On your vCenter server right-click and select All vCenter Actions>Add Permission.
- You can now select to search MyDomain.Local for VMware-FullAdmins and add it at this level to have full administration capabilities for the environment.
- Now just populate VMware-FullAdmins with those you need to manage your environment and you can stop handing out your built-in privileged accounts!
Showing posts with label vCenter. Show all posts
Showing posts with label vCenter. Show all posts
Monday, July 25, 2016
vCenter Appliance: LDAP Integration
Who wants to give out their root password whenever they need to have IT staff manage their VMware environment? No one. Fortunately this one is fairly straightforward. Our goal in the end will be to land on the vSphere vCenter Web Portal and be able to check the box to pass through our Windows credentials. For this sample I am going to utilize a group call VMware-FullAdmins as my security group and the domain administrator account for validation. Avoid using the AD administrator account in any production environment. Set up a delegated VMware administrators group and assign those users needing permissions.


Monday, July 18, 2016
Adding ESXi Hosts to your vCenter Appliance
Once you have your vSphere vCenter 5.5 appliance up and running, configured with any desired Datacenters and Clusters, it is time to add ESXi hosts.
- Log into your vCenter web portal <IP>:9443 with an administrator account.
- Locate the datacenter or cluster you wish to add your host into. Right click on it and select add host.
- Now you will need to fill in the name and location of the host, plus the local account for access.
- Verify that the host was connected to and if any VMs exist they are all listed.
- Assign your license
- Use lockdown if desired. Lockdown prevents direct access to the host.
- Review all of the settings and click Finish to initiate.
Saturday, July 16, 2016
Configuring the vCenter Appliance
Previously I provided an overview of the straightforward importation of the VMware vCenter Appliance. Today I will walk through the configuration of our newly deployed vCenter Appliance.
At this point you have a vCenter Server Appliance that is online with a static IP and communicating with Active Directory. Now go over to the Admin tab and change the root password. You can open up an Adobe Flash enabled web browser and navigate to <IP>:9443 to access to portal of your new vSphere Web Client. Right now only root can log in - something we will want to take care of down the road.
- Once you have completed your deployment of the appliance and powered it on, you can open the console view in the vSphere Client to get a quick glimpse at what is in store for configuration. You need to have DHCP enabled on the assigned network mapping to get the IP in step 1 to present.

- Note: If you are doing a greenfield deployment with 5.5 as I am, there is a feature to be aware. You will need to kill Tomcat before continuing or the Wizard will fail. Use the console or SSH to your new instance and type service vmware-vpxd stop at the prompt and hit enter. This will stop the vpxd service - not doing this will cause errors. I haven't found this formally documented anywhere unfortunately rather through trial and error.
- Navigating to the DHCP assigned IP - https://10.0.0.164:5480/ - you will get hit with the much expected certificate warning. Depending on your browser, methods for bypassing this vary. (Hopefully since you are deploying vCenter you know how to add a security exception for your browser!).
- Assuming use of a Static IP - close out of the Wizard.
- Click on the Network tab
- Select the Address Button
- Change the IPv4 Address Type to Static - you now can change the hostname. Fill in the desired hostname, IP, gateway, DNS Server, mask, and save the settings.
- The network changes made will require reloading the URL for management to your new static IP. Log back in and under utilities Launch the Setup Wizard.
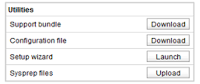
- Follow along on the setup wizard:
- Log in with the default username/password combination of root/vmware and accept the EULA.
- Enable or leave disabled (my choice) data collection
- Select the custom configuration radio button. You will get to define each step except NTP here. NTP will use the specified Active Directory PDC Emulator provided time.
- Check the Active Directory Enabled box & Fill in the appropriate values for your domain
- For SSO select Embedded as well, just like the DB. Enter a password for the administrator account.
- With authentication configured for Active Directory the the time options automatically get configured to utilize AD synchronization.
- Once reviewed and configuration initiated all of the above options shoudl succeed.
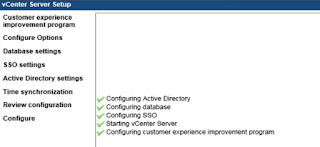
- Click close and you should be up and running:
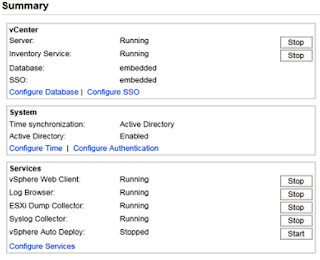


A couple of considerations:
Database Settings
Why did I choose to use the embedded DB? In this setup I don't have a separate SQL server for the database. Given I just have a small two node lab, this isn't an issue. Keep in mind, VMware only supports external Oracle databases. Fortunately the embedded PostgreSQL database will support up to 1,000 hosts and 10,000 virtual machines. If you are surpassing those numbers, you probably have access to Oracle. I am not so fortunate.
Sizing
By default the Services configurations are for small environments. I will leave my Services configurations at the default settings. This is one screen where the settings will impact multiple settings including modifications to the VM which runs the appliance. Reference KB2057376 to review large scale deployment tuning.
At this point you have a vCenter Server Appliance that is online with a static IP and communicating with Active Directory. Now go over to the Admin tab and change the root password. You can open up an Adobe Flash enabled web browser and navigate to <IP>:9443 to access to portal of your new vSphere Web Client. Right now only root can log in - something we will want to take care of down the road.
So now you have the vCenter appliance up and running! Great! Oh, yeah, we don't have any hosts or VMs to manage yet! I'll have to get to this next time.
Thursday, July 14, 2016
Deploying the vCenter Appliance
Much like other vendors, VMware has jumped on the appliance bandwagon. Starting with VMware 5.x and continuing on to 6.x, the vSphere vCenter tool has been available as an importable appliance and not just the traditional Windows install. Simple to get up and running, a high-level of the steps needed for deployment can be found below.
- Download the Appliance from VMware.com for your appropriate version. In this example I will be using 5.5. You can download either the full OVA file or the individual OVF and hard disk files. For all-in-one ease, here we are going with the OVA.

- Next open up your local vSphere Client. Assuming you don't have vCenter in place already, you will need to point to a host for authentication and then select File>Deploy OVF Template.
- Browse to your download and select next.
- Review your details to make sure you selected the appropriate template.

- Name your appliance appropriately.
- Select an appropriate storage datastore.
- Choose an appropriate disk format (if no one is monitoring storage growth - stick with Thick)
- Select an appropriate Networking Mapping
- Finish your deployment and sit back while the appliance imports. (A few minutes typically.)


It was that simple! Once the import is complete you can power it on and use the default combination of root/vmware to log in.
Subscribe to:
Posts (Atom)